Overview
This project is a Java implementation of the UML state machine specification as described in UML superstructure 2.4.1. It is implemented with Java 8 and packaged as a valid OSGi bundle.
The implementation supports nearly every single feature of behavioral state machines:
- states: simple, composite, orthogonal and submachine
- pseudo states: initial, entry point, exit point, junction, choice, join, fork, shallow history, deep history and terminate
- transitions: external, internal and local
- transition events, transition guards, transition effects, the two latter have easy and typed access to the event and context data
- state entry and state exit behaviors, with easy and typed access to context data
- asynchronous state activity behaviors, with easy and typed access to context data
- completion events (transition with no triggers/events)
- time events
- custom events
and comes with an easy-to-use builder API that takes away from the developer the inherent complexity of UML state machines.
Other features include, but not only:
- build once, use many times:
StateMachineinstances do not contain any execution data and are not changed throughout the execution of a state machine. Therefore, they can be reused as many times as necessary. - various state machine executors: synchronous/synchronized executor, lock executor, queued executor, sharded executor
- state machine listeners: to listen to everything that happens in the state machine
- prioritized transitions: when more than one transition is enabled for a (pseudo) state, only one will be fired. You can define which it will be.
- configurable state machine executor: auto start, thread pool for asynchronous events and activities, ...
It is heavily tested with more than 120 state machines and more than 700 unit tests. Code and branch coverage is above 90%.
This project is licensed under the Apache License 2.0

![]()
Get it!
Maven
Functionality of this project is contained in the Java package com.lympid.core.
Add the following dependency to your pom to use this package:
<dependency>
  <groupId>com.lympid</groupId>
  <artifactId>lympid-core</artifactId>
  <version>0.9.0</version>
</dependency>
Non-Maven
Jars are also available for direct download on maven central repository.
Use it!
UML state machine is not an easy topic for the non-initiated.
Tutorial 1: A simple state machine
Let's implement the following state machine which describe an on/off switch:
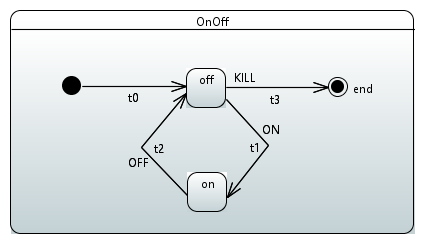
First, create your state machine builder:
StateMachineBuilder builder = new StateMachineBuilder("OnOff");And build the initial vertex with all its outgoing transitions:
builder                  // the state machine builder
  .region()              // a (pseudo) state always belong to a region!
    .initial()           // adds an initial pseudo state in this region
      .transition("t0")  // adds a transition named "t0" to the initial pseudo state
        .target("off");  // defines the target of the initial transition
Now, repeat the operation for the next (pseudo) state. Let's do the "off" state:
builder
  .region()              // this is the same region as before, same instance.
    .state("off")        // creates a simple state named "off"
      .transition("t1")  // adds an external transition named "t1" to the state "off"
        .on("ON")        // t1 can only be fired when the state machine receives the event "ON"
        .target("on")    // t1 targets the "on" vertex
      .transition("t3")  // adds an external transition named "t3" to the state "off"
        .on("KILL")      // t3 can only be fired when the state machine receives the event "KILL"
        .target("end");  // t3 targets the "end" vertex
And again with the vertex "on":
builder
  .region()
    .state("on")
      .transition("t2")
        .on("OFF")
        .target("off");
And the final state:
builder
  .region()
    .finalState("end");
Now, get a StateMachine instance, choose which StateMachineExecutor you want to use and start it:
StateMachine machine = builder.newInstance(); // builds and validates the state machine; the result is cached

StateMachineExecutor fsm = new SyncStateMachineExecutor();
fsm.setStateMachine(machine);
fsm.go();
When go is invoked, the state machine auto starts by default and the initial transition is fired.
Therefore, the state machine is now on state "off", waiting for either event "ON" or event "KILL".
You can see so by takign a snapshot of the state machine and looking at its active state configuration:
System.out.println(fsm.snapshot().activateStates()); // outputs offThen, use the take method to feed the state machine with events. For instance:
fsm.take(new StringEvent("ON"));
System.out.println(fsm.snapshot().activateStates()); // outputs on

fsm.take(new StringEvent("OFF"));
System.out.println(fsm.snapshot().activateStates()); // outputs off

fsm.take(new StringEvent("KILL"));
System.out.println(fsm.snapshot().activateStates()); // outputs end
And that's it!
More tutorials to come...
Meanwhile, you can the hundred of test state machines this project has